Sunday, May 26, 2013

Korres Lip Butter


These luxurious little lip butters from a Greek company are sure to satisfy any balm fetishist’s wishes. The formula is really thick and moisturizing, without feeling heavy or sticky. They come in several flavors, and all but Guava are lightly tinted, giving your lips a subtle hint of color when you don’t want to use heavy lipstick. My only complaint is that they don’t smell too much like their namesakes. It’s more as if they share the same unique fruity/sweet base, with a dash of some other fruit (which may or may not be the one they’re named after.)

#1 Guava- Smells so much like coconut (not that this is a bad thing!) that you wouldn’t know it’s guava unless you read the jar. Very sweet and nice, though. It doesn’t give any color, just adds some shimmer and moisture to dry lips. 

#2 Jasmine- This smells very sweet, without a particular fragrance. It’s a very, VERY subtle sheer pink.

#3 Mango- I can certainly pick out the mango in this one! The color is a fun, sheer orange!

#4 Pomegranate- If there’s actual pomegranate in this, it’s lost on me. All I smell is the fruitiness, albeit lightly. The shade is a really pretty sheer intense pink, though.

#5 Quince- A more intense fruity base. A lovely magenta shade. (My favorite!)

#6 Plum- Fruity with something like… grape and prune? It’s a lot better than it sounds, and gives a deep reddish purple tint that would look very nice on darker skins.

#7 Wild Rose- Fruity with a hint of rose. A hint of deep red, very pretty.

Final Verdict: Love it!

Ingredients:
Polybutene, Trimethylolpropane Triisostearate, Hydrogenated Polydecene, Polyethylene, Hydroxystearic Acid, Stearalkonium Hectorite, Propylene Carbonate, Polyglyceryl-3 Diisostearate, Sucrose Tetrastearate Triacetate, Dicalcium Phosphate, Tocopherol, Flavor (Aroma), Carthamus Tinctorius (Safflower) Seed Oil, Ascorbyl Palmitate, Oryza Sativa (Rice) Bran Wax, Punica Granatum Extract, Butyrospermum Parkii (Shea) Butter Extract. May Contain: Titanium Dioxide, Red 7 Lake, Red 6, Iron Oxides.

Saturday, May 25, 2013

Cotton Candy Lids


Missed the county fair last time it was in town? I did. No corn dogs, no cute petting zoo, no roller coasters, no tilt-a-whirl, and no beautiful, pastel toned cotton candy. While there’s not much I can do about it until next year, I am cheering myself up with this lovely little cotton candy inspired eye tutorial. I decided to use a sparkly theme for this, but you can choose matte tones if you’re fonder of those. To join me, you’ll need:

Eye lid primer (Nars Smudge Proof Eye shadow base)
Turquoise Eye Shadow (L’Oreal Bright Shadow Duos in Showy, lighter shade)
Magenta Eye Shadow (L’Oreal Bright Shadow Duos in Reckless, lighter shade)
Light pink Eye Shadow (NYX Trio Eye Shadow in Cherry/Cool Blue/Hot Pink)
Baby blue Eye Shadow (Ditto)
Indigo Eye Shadow (Instant Beauty Loose Powder in Screaming Purple)
Black gel liner (Maybelline Lasting Drama Gel Liner in Blackest Black)
Lavender pencil liner (YSL Pencil liner in Purple Silk)
Black pencil liner (YSL Waterproof pencil liner in Velvet Black)
White Eye Shadow (Estee Lauder eye shadow in Tranquil Moon)

For the tools, you’ll want either sponge-tip applicators or whichever brush is more comfortable for you to apply an even wash of color. You’ll also want a couple of angled brushes. Don’t forget to include your favorite mascara (YSL Singulier Waterproof in Vibrant Black!) 

Step 1-
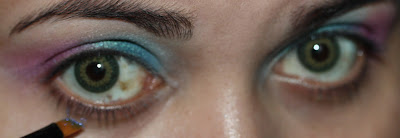
Totally optional, but I love how purples and lavenders look with green eyes, so I threw my contacts on!
Step 2-
Prime your lids only! You’ll want the most vibrant color here.

Step 3-
Apply turquoise eye shadow to the inner half of your eye. Try to make it even and don’t be afraid to deposit a lot of color. You want this to be bold. It’s okay if the color fades a little bit towards the middle, though.

Step 4-
Fill in the other half of your lid with the magenta eye shadow. If the eye shadow base is too dry at this point, consider adding a little more. Otherwise, work through Steps 3 and 4 quickly! My suggestion is to prime and paint one eye at a time.
Step 5-
With your brush, lightly blend the line where the two colors meet. It should turn a lovely shade of purple. You’ll want to create a gradient effect.

Step 6-
Dab some of the light pink shadow along the area you painted magenta, in the crease. Make sure the two colors blend.

Step 7-
Do the same with the inner corner of the crease and the baby blue shadow. The final effect is to have the darker shades fading into the lighter ones.

Step 8-
  Line your bottom lids using the indigo shadow. If you’re using loose powder like me, you might want to add a little primer to avoid fall out. If not, just make sure to keep a steady hand and dab off excess product before you bring it to your eye.


Step 9-
Liner your top lids with black gel liner. Be careful to keep the liner relatively thin.


Step 10-
Extend the black liner outwards, in a cat-eye shape.

Step 11-
Use your lavender eyeliner to draw in a connection between the black liner and the indigo shadow. The soft texture of the pencil should allow you to create a gradient effect between the two colors.


Step 12-
Add a small dab of white shadow in the inner corners of your eyes and sweep it over your brow bone, above the pink and baby blue. This will bring the look together.
Step 13-
Wrap things up with a sweep of black pencil liner on your water line and mascara.


Enjoy!

Sunday, May 19, 2013

Sparkly Lips Tutorial


The following is a cute little tutorial for adorably twinkly lips! We’re gonna go with a pink color scheme, because the materials will be easier to find in this shade, and heck, pink and sparkles just belong together!

You’ll need:
Shiny or metallic hot pink lipstick (NYX lipstick in Flower)
Shimmer powder (NYX Shimmer roll-on in Pink)
Pink glitter (NYX Glitter on-the-go in Hot Pink and LA Splash Body Glitter in Santa Monica)
Sparkly pink lip gloss (Lancome Juicy Tubes in Raspberry Ice)

Step 1:
Apply your pink lipstick. 

Step 2:
Apply the shimmer powder over your lips. If you’re using the one from NYX, just roll the product onto your finger and dab.

Step 3:
Add a coat of the sparkly pink lip gloss. This will help the glitter stick.

Step 4:
Dab the pink glitter on your lips. You’re done!

Optional step:
If this look is too over-the-top or you used too much glitter and it feels too grainy, just apply another coat of lip gloss over it. It’ll smooth it out a bit and reduce some of the shine.


Enjoy!