Sunday, July 29, 2012

Cute Gradient Lips Trick (with variations)


Are you tired of using the same old, boring swipe of lipstick to complete your look? If you are, I have a neat little trick to liven up your lip color.

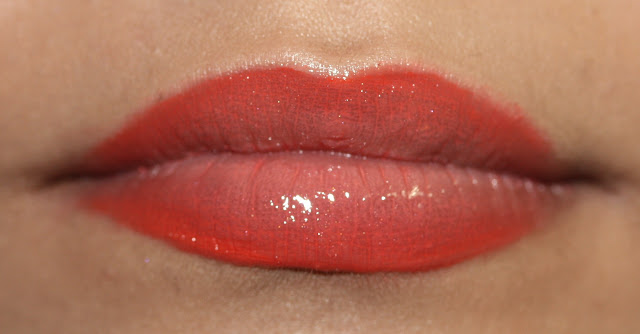
A great way to add a little fun and life into your lipstick is to use a gradient effect. It stands out, but isn’t so over the top that you can’t use it during the day. It’s also extremely easy to achieve. Let’s give it a try, shall we?

Version 1: Lovely Pink Gradient

Tools:
Ulta Lipstick in Sheer Rose
M.A.C. Lip Glass in Pink Fade
The Color Workshop Professional Series Lip Liner in Red
Lip balm
A lip brush 

Step 1:
You want to start off by picking out the right lip products. You’ll want a liner, a lipstick, and a gloss that are all from the same color family. The liner should be the darkest, then the lipstick, and the gloss should be the lightest or even clear. I chose the Color Workshop liner used here, because even though it is a red, it has a lot of magenta mixed into it, which will look very nice with the pink.

Step 2:
Prep your lips by rubbing on some lip balm. Here I am using Bliss’s fabulous balm. Use one that doesn’t dry up easily or is too solid and it might help if you put on a little more than you normally would. To really make the effects of the gradient work, you need your canvas to be slippery, so apply away!


Step 3:
Apply your lipstick. Make sure it’s a nicely pigmented shade that stands out on your lips.

Step 4:
Take the lip liner and line your lips, perhaps a little thicker than you normally would. Don’t worry if you’re starting to look like The Joker!

"Why so serious?"


Step 5:
Take your lip brush and start blending the liner into the lipstick in small, gentle strokes. You want to blend it away from the edges of the lip, not towards it. Be careful not to blend it all away or all the way to your mouth’s opening. The effect should start taking place!


Step 6:
If the liner is no longer visible or if you want to deepen the color at the edges, go ahead and line your lips again, but take care to keep this line very thin. You don’t want to spoil the work you already did!


Step 7:
Apply the lip gloss carefully in the middle. You don’t want it to smear the liner. The main purpose of it is to highlight the lightest part of the gradient.


Step 8:
You’re done! Take care not to press your lips together while wearing this look. If you put on too much lip gloss, dab at it carefully with a tissue. VoilĂ ! 


Version 2: Cool Violet Gradient

Tools:
Nyx Lipstick in Power
Ulta Lip Gloss in Charmed
Yves Saint Laurent Eye Pencil (Yes! Eye pencil!) in #10 Purple Silk

This style can also look great with cooler colors. However, sometimes finding the right shade of lip liner can be a little bit of a hassle. How to fix this? Using a colorful, matching eyeliner, of course! If you can safely use an eyeliner on your waterline, then you’ll be able to apply it on your mouth. 


However, eyeliners might be a little bit trickier when it comes to blending them in. Make sure to coax them a little harder with the lip brush and don’t forget your balm!


Version 3: Dramatic Orange Gradient

Tools:
M.A.C. Lipstick in Morange
Profusion Diamond Shine Lip Gloss in A10- Orange
Sephora Nano Lip Liner in Really Red

Sometimes the lipstick you already have might be a little too rich and bright for this look (Any fans of Morange can attest to this!) The key is to not apply it in a stroke, but to dab it softly onto your lips with a light hand. Don’t be afraid to lift some of it off with a tissue, until it is light enough to work with. 


While the effect might not end up being as striking, it is still very beautiful!

Version 4: Romantic Peach Gradient

Tools:
Yves Saint Laurent Rouge Volupté
Profusion Diamond Shine Lip Gloss in A10- Orange
M.A.C. Lipstick in Morange
Lipstick? No problem! Gloss? Check! Liner? Uh-oh…

Not everyone is a fan of lip liners (or colorful eye liner!) and while this look is hot, who’s gonna go out and buy a product they’ll have no other uses for? ;) So what’s a gal to do?
That's what!
Luckily, with your handy lip brush any shade of lipstick can be instantly turned into a liner!


The application might be a little messier, but a quick wipe around the edges of your mouth will clear that up. The final result? Stunning!


Friday, July 27, 2012

The Body Shop Summer Fragrances


Fans of The Body Shop’s classic perfumes will be excited to check out the brand’s limited edition summer fragrances. These three, new perfumes have been out for a few months, yet not much fuss has been made over them… which is incomprehensible, as they’re absolutely lovely!
The three newcomers are upgraded, summer-inspired versions of three Body Shop oldies, but goodies (White Musk, Love Etc…, and Dreams Unlimited) and give their older counterparts, a fresh, girly new spin. Like all Body Shop perfumes, they have a lotion counterpart, though I can’t say that the smell transfers well into the new medium.

The only negative aspect of these perfumes is that like all Body Shop fragrances, they contain no alcohol… a plus for your skin, a minus if you want the scent to last from day to night. Vegans and vegetarians will be happy to know that any musk used is synthetic and cruelty-free.

My thoughts on the individual fragrances:


Dreams Unlimited- Sun Fresh: My favorite of the three! This perfume is rich with fruity-floral notes and a lingering hint of ocean spray. The fruity portion has zesty lemon, but most prominently juicy, clear watermelon, while the florals give us iris and neroli. It is a fresh, clean smell that would be perfect for a fun picnic and summer games day at the park or the beach!


Love Etc…- Sun Kiss: Those who love the classic Love Etc… will be pleased to know that this version shares the same citrus-powdery loveliness, but with a sexy new overlay. While we have the same neroli, bergamot, and jasmine that made the first one so wonderful, this one has a sensual touch of nectarine and amber that’s perfect for a romantic patio dinner while the sun is setting. 


White Musk- Sun Glow: Unlike the woodsy musk of the original White Musk, Sun Glow has a powerful zing of lemon, followed by a warmer and sweeter aftertaste of peony and amber. This fragrance would be a hit at moonlight barbeques and other nighttime excursions.

Hurry to your nearest Body Shop and pick them up before they’re gone!
(PS- They are no longer available on the website, but should still be available in-store.)

Final Verdict: LOVE IT!

Ingredients:
Dreams Unlimited Sun Fresh: Alcohol Denat. (Solvent/Diluent), Aqua/Water (Solvent/Diluent), Parfum/Fragrance (Fragrance), Limonene (Fragrance Ingredient), Citrus Nobilis Peel Oil/Citrus Nobilis (Mandarin Orange) Peel Oil (Fragrance Ingredient), Linalool (Fragrance Ingredient), Hydroxycitronellal (Fragrance Ingredient), Citronellol (Fragrance Ingredient), Alpha-Isomethyl Ionone (Fragrance Ingredient), Geraniol (Fragrance Ingredient), Citral (Fragrance Ingredient), Benzyl Benzoate (Solvent), Coumarin (Fragrance Ingredient), Benzyl Salicylate (Fragrance Ingredient), Denatonium Benzoate (Denaturant).
Love etc... Sun Kiss: Alcohol Denat. (Solvent/Diluent), Aqua/Water (Solvent/Diluent), Parfum/Fragrance (Fragrance), Linalool (Fragrance Ingredient), Limonene (Fragrance Ingredient), Citrus Aurantium Dulcis Peel Oil/Citrus Aurantium Dulcis (Orange) Peel Oil (Fragrance/Essential Oil), Citronellol (Fragrance Ingredient), Alpha-Isomethyl Ionone (Fragrance Ingredient), Benzyl Salicylate (Fragrance Ingredient), Geraniol (Fragrance Ingredient), Anisyl Alcohol (Fragrance Ingredient), Denatonium Benzoate (Denaturant), Jasminum Grandiflorum Flower Extract/Jasminum Grandiflorum (Jasmine) Flower Extract (Fragrance Ingredient).
White Musk Sun Glow: Alcohol Denat. (Solvent/Diluent), Aqua/Water (Solvent/Diluent), Parfum/Fragrance (Fragrance), Limonene (Fragrance Ingredient), Citrus Medica Limonum Peel Oil/Citrus Medica Limonum (Lemon) Peel Oil (Essential Oil), Alpha-Isomethyl Ionone (Fragrance Ingredient), Hydroxycitronellal (Fragrance Ingredient), Citronellol (Fragrance Ingredient), Geraniol (Fragrance Ingredient), Citral (Fragrance Ingredient), Cananga Odorata Flower Oil (Fragrance/Essential Oil), Linalool (Fragrance Ingredient), Denatonium Benzoate (Denaturant).


Friday, July 20, 2012

The Body Shop’s 4-Step Smoky Eye Palettes

After playing with my Victoria’s Secret palette, I was eager to try out these two exciting-looking kits from The Body Shop, at $28 each


The looks depicted on the covers are very dramatic, yet use a neutral combination of colors (Golden Brown and Silver Black,) which is not something you see commonly. They come with four eye shadows (a light, a medium, a dark, and a highlight,) a little eyeliner in a corresponding shade, and a mini-brush.


 Opening them up, I was most excited by the highlight shade in the Golden Brown kit. It’s gorgeous pale gold, with flecks of light green. However, once on skin, the colors don’t seem as pigmented, even with the use of primer (stripes on the right.)


The first step on the back of the box has you start off with the light and medium shades. To be perfectly honest, I was turned off at how chalky and sheer they looked on my skin. There was also a little more fall-out than what I’m used to when applying a pressed powder shadow. However, at this point, I figured that since the darkest shade has a very prominent role in the look, chances were it’d smooth everything out...

…Was I ever wrong…


...Dear Readers, I apologize for the following gross picture, but yuck!
 The fall-out on the darkest color is unbelievable! I tried my best to keep it from smearing everywhere, from using the brush that comes specifically with the kit (it’s not very good) to using the best of my make-up applicators. Nothing could keep that flaky, smearing powder from going everywhere! I finally had to use a make-up remover wipe to smooth out the edges. If you already own or plan on purchasing this product, do NOT apply your foundation and concealer beforehand. You’ll only have to do it again.

After dealing with the whole mess, I was surprised to learn that the highlights aren’t powder, but rather cream shadows. While I was hoping this would be the saving grace for this kit, the consistency made them hard to apply. To my disappointment, most of the green reflection of the Golden Brown highlight was completely lost. One quick sweep over my waterlines shows me that the pencil liners are more for show than anything. 

Is it worth it? Personally, I'll probably keep the kits around to use as individual shadows, but I’m not too impressed by the instructions, especially considering what the box promises. The final outcome isn't terrible, but it’s not what I was looking for. Maybe in the future I’ll come up with better uses for these shades.

Here is the final look when using Silver Black. I’m a little bit fonder of this result, but there was still a ridiculous amount of shadow falling everywhere. Do not use these kits on the go, you will regret it!


Final Verdict: This is gonna be a tough one… I do like the looks, even though they were kind of a hassle to achieve. The shadows could also be useful to have around. I guess if you don’t mind the trouble, you can take it as a Like It. If not, please LEAVE IT.


Ingredients: Mica (Opacifier), Talc (Absorbent/Bulking Agent), Synthetic Fluorphlogopite (Viscosity Increasing Agent), Lanolin Oil (Skin Conditioning Agent), Dimethicone (Skin Conditioning Agent), Isostearyl Neopentanoate (Emollient), Zinc Stearate (Binder), Isopropyl Palmitate (Emollient), Copernicia Cerifera Cera (Stabiliser/Viscosity Modifier), Synthetic Wax (Binder/Emollient), Polymethyl Methacrylate (Emollient), Sclerocarya Birrea Seed Oil (Skin Conditioning Agent), Silica (Absorbent), Ethylhexyl Palmitate (Skin Conditioning Agent), Ricinus Communis Seed Oil (Emollient), Tocopheryl Acetate (Antioxidant), Sorbitan Stearate (Emulsifier), Hydrogenated Caprylyl Olive Esters (Binder), Methylparaben (Preservative), Propylparaben (Preservative), Lauroyl Lysine (Skin Conditioning Agent), Tin Oxide (Opacifier). [+/- CI 77499 (Colour), CI 77491 (Colour), CI 77492 (Colour), CI 77891 (Colour)]. Isononyl Isononanoate (Emollient/Skin Conditioner), Triethylhexanoin (Fragrance Ingredient), Calcium Sodium Borosilicate (Bulking Agent), Silica (Absorbent), Silica Dimethyl Silylate (Binder/Viscosity Modifier), Candelilla Cera (Stabiliser), Polyethylene (Opacifier), Synthetic Fluorphlogopite (Viscosity Increasing Agent), Mica (Opacifier), VP/Hexadecene Copolymer (Film Former), Tocopheryl Acetate (Antioxidant), Tin Oxide (Opacifier), Sclerocarya Birrea Seed Oil (Skin Conditioning Agent), Synthetic Wax (Binder/Emollient), Isopropyl Titanium Triisostearate (Emollient). [+/- CI 77891 (Colour), CI 77000 (Colour), CI 77491 (Colour), CI 77499 (Colour), CI 19140 (Colour), CI 15850 (Colour)]. Hydrogenated Vegetable Oil (Emollient/Hair Conditioner), Hydrogenated Castor Oil (Emollient), Mica (Opacifier), Ceresin (Stabiliser), Sclerocarya Birrea Seed Oil (Skin Conditioning Agent), Tocopherol (Antioxidant), CI 77499 (Colour), CI 77491 (Colour), CI 77492 (Colour). 

Tuesday, July 17, 2012

The Perfect (And Easy!) French Manicure


Who doesn’t love the classic, polished look of a French manicure? Sadly, they’re a little bit tricky to pull off at home and even if you could afford to go to the salon every week, who honestly wants to?! That’s why I’m so happy to have this simple little trick available to me, so that I can give my nails a pretty and elegant look whenever the mood strikes. 

You will need:
A base coat
A top coat

A sheer French manicure polish


French tip guides
Nail polish remover pads
(Or nail polish remover and cotton balls/rounds)
A nail care stick
A French tip pen, like Sally's Hansen's French Manicure White Tip Pen


Step 1:
Begin by making sure your nails are nicely filed (no jagged edges!) and buffed. I personally prefer French manicures on short nails, but you can make them a little longer if that’s what you’d like. Don’t forget to buff them. A simple buffing block from the drugstore will do and this step not only helps to give your nail a nice, smooth finish, but allows for the polish to stick to it better, leading to less chipping.


Step 2:
If you haven’t already done so, push cuticles back with the nail care stick.


Step 3:
Apply a layer of base coat to your nails. Never, never, never and I mean NEVER put polish on your nails without using a base coat first. Polishes weaken the nails, making them more likely to break. Not only that, but certain dark polishes (red is a common culprit) can sometimes stain your nails, leaving behind a gross yellow tint. Even polishes that proclaim to not need a base should be used with one. Also, never use a combination top/base coat. Just like combination shampoo/conditioners, these are two separate products and combining them into one makes it so that neither function is properly fulfilled. And if that’s not enough to convince you, base coat will also help keep your pretty manicure safe from chipping by helping the paint stick to the nail better.


Step 4:
Let the base coat dry entirely. If you skip this step, then the guides will likely rip it off after you use them. Use an at-home nail dryer or place them in a bowl of ice water for a few moments at a time, until it’s dried entirely. 


Step 5:
Take the nail guide and place it on your nail. It might be a little tricky to position it, as you want it to be perfectly in the middle and leave a straight edge for the white part of your manicure.  When you have it in place, use the nail care stick to gently nudge it down into the sides of your finger.


Step 6:
Follow the instructions on the package for your white tip pen. Once it’s ready, paint a line across the area you separated with your tip guide. Be careful, as some of these can be a little bit runny and you don’t want too much to drip onto your nail. 


Step 7:
Let the white polish dry. Once it’s done, carefully peel off the nail guides. This part might be a little frustrating if the polish isn’t perfectly dry or if you used too much and some of it leaked under the guide. For a quick fix (without having to start all over, wrap a nail polish remover pad on the pointiest end of a nail care stick and carefully wipe off any excess white. You can also use this trick to straighten or thin out the white line to your preference. Don’t forget to dab a little base coat on the areas you cleared off.


Step 8:
Use your sheer nail polish. Add a second coat once the first one dries if you like.


Step 9:
When the last coat you applied is no longer wet, finish the manicure off with a layer of clear top coat.


Step 10:
Sit back and relax while your nails dry completely! Also, if you have top coat on your cuticles like me, go ahead and gently scrape them off with the nail care stick and nail polish remover pad, but be careful not to smudge your actual nail. Go ahead and rub some luxurious hand cream on and don’t forget to keep your nails healthy by rubbing some cuticle cream or oil into them in the following days. 


Enjoy your fabulous nails!