Hey everyone! Today I’m very happy to bring you our
newest and most exciting feature (Albeit, a day late! D’oh!): The Gilded Lily
Beauties.
My Beauties will be lovely ladies, whom I have either met
or befriended, that are volunteering to appear as guests in tutorials. Remember,
beauty can’t have only one face, so prepare to see many more of them in entries
to come. My first beauty for this exciting tutorial (Lady Gaga’s look from her “Judas”
music video) will be Rachel. We are happy to welcome her to the Gilded Lily
family!


Pt1: Face
Tools:

Step 1-
Lady Gaga always has perfectly smooth skin in all her
videos. Begin by applying a mattifying primer. Here we’re using Korres
Pomegranate Mattifying Primer. Use a cosmetic wedge or sponge to cover your
whole face, except for eyelids and lips.

Step 2-
Use a good foundation brush to apply your foundation. Being
used is Urban Decay Naked Skin Liquid Foundation. I’m using a color that’s a
little bit light for Rachel because I want to give her that otherworldly look
Lady Gaga has in the video. If you do this as well, don’t forget to extend the
color down to your neck, or it’ll look like you’re wearing a mask.


Step 3-
Now use a high-pigmented concealer, like Amazing
Cosmetics on any blemishes or under-eye circles.

Step 4-
Finish off your face by applying a translucent powder
like Make-up Forever HD Mircrofinish Powder. Don’t go crazy with this one,
though. The less the better.


Pt2: Brows and Lids
Tools: (also used for eyeliner steps!)


Gaga’s eyebrows a pretty wild in the video. While I’m not
going to copy the exact look, I am going to give Rachel fuller, oddly shaped
brows that are reminiscent of the style Lady Gaga wears. If you already have
pretty full brows, then skip this step. But if yours are like Rachel’s, then
begin filling them out with a natural toned eyebrow pencil.
Step 2-
Now lightly fill your brows in with a black brow pencil
or eye liner. If we’d done this step before it would have looked too harsh.


 Step 3-
Use an angled brush to blend the liner and give it a
softer effect.
Step 4-
Repeat the same step on the other side and add two little
wings at the end of each brow. Don’t worry if they’re not perfect, you can always
use hair and accessories to hide them.

Step 5-
Use an eyelid primer (here we’re using Nars Smudge Proof
Eye Shadow Base.) This one is great because it won’ t crease and will make the
color last all day.


Step 6-
Take a light nude and cover your lids. Here we’re using
Virgin from Urban Decay’s Naked Palette.


Step 7-
With a tapered brush, apply a matte brown (Buck from
Naked Palette) to the crease and blend it in with a fluffy brush.


Pt3: Highlighting and Contouring

Step 1-

Using a matte highlighter, like Anastasia Eye Lights,
apply it down the bridge for your nose. Then tap it in until it’s blended. This
will begin to mimic Lady Gaga’s nose.


Step 2-
Apply a shimmery, highlighting blush to your cheeks (The
Body Shop’s Shimmer Waves) to make your skin look ethereal.
Step 3-


 Apply a liquid shimmery highlighter to the tip of your
nose (make sure it’s one that really stands out!) and anywhere the light hits
your face (cheeks, forehead, etc.) Make sure to blend it in. You’re now
glowing!
Apply a liquid shimmery highlighter to the tip of your
nose (make sure it’s one that really stands out!) and anywhere the light hits
your face (cheeks, forehead, etc.) Make sure to blend it in. You’re now
glowing!
Step 4-
Using a color like Buck from the Naked Palette again,
take the fluffy brush and blend it into the sides of your nose. Don’t use a lot
of product, as the point is to create shadow, not deposit color.


Pt4: Eyeliner
Step 1-
Here comes the tricky part! Using a gel liner and angled
brush, begin lining your upper lids. Extend the line past the corner of your
eye, with a slight upward sweep (like cat-eye liner.) Don’t forget to dab a
little color into the inner corner of your eye.


Step 2-
Begin making a thin line under your eye (not lining your
bottom lid) with a felt tip eye liner pen. Add a little hook at the inner
corner of your eye. Keep the line loose and curvy, following your eye’s shape.


Step 3-
Thicken the line near the middle, but keep the shape
rounded.

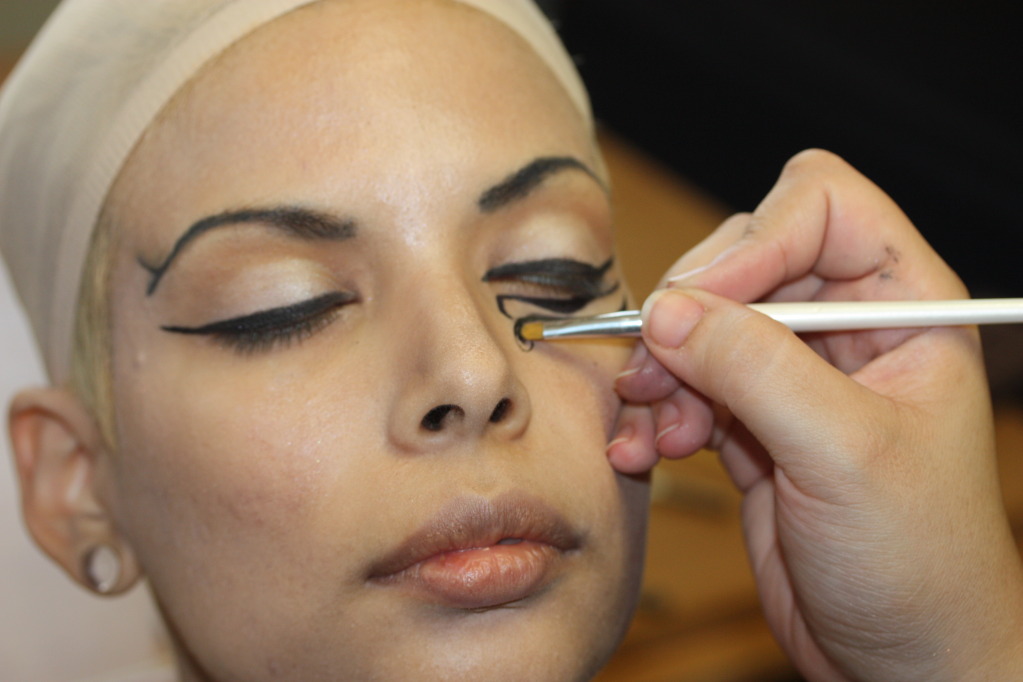
Step 4-
Repeat a similar line underneath the first one. Don’t
worry if they don’t match perfectly. The make-up in the video is very loose and
organic, not perfectly symmetrical. However, make sure that instead of the hook
in the inner corner, there’s an outline of a tear drop shape.


 |
Step 5-
Fill in the tear drop with black gel liner and a
concealer brush.

Step 6-
Repeat on the other eye. Again, don’t worry if they’re
not perfectly even on both sides!


Step 7-
Finish up your liner with lining your waterline with
white. This will help give you Lady Gaga’s large eyes.

Pt5: Lips

Step 1-
Her lips are luscious and full in the video. Start by
applying a lip balm.

Step 2-
If you don’t have Lady Gaga’s full pout, rub on some lip
plumper. But if you’re lucky enough to do so, skip this step! ;)


Step 3-
Apply a shimmery, pinky nudge like MAC’S Viva Glam V.
Lady Gaga’s red lips have a slightly brownish tint to them in this video. This
shade will help achieve that.

Step 4-
Mix a little red lip glaze with the lipstick. Here I’m
using Korres Lip Butter Glaze in Wild Rose.

Step 5-
Layer a deep red lipstick (like YSL’s Rouge Volupte in
Red Taboo) over it.

Step 6-
Use a cranberry lip liner to line your lips. Employ the
blending technique from this tutorial to achieve a pretty, blended effect.


Pt6: Accessories
Step 1-
Now the really fun part! If you already have long, blonde
locks, then go ahead and let them fly loose! If not, wear a lovely wig like
Rachel (and don’t forget the wig cap we put on her at the start of the
tutorial!)

Step 2-
Wrap a bandana around your head and pull some hair over
it to one side, rock-star style.

Step 3-
With a pointy Q-tip apply some eyelash glue to your
cheek.

Step 4-
Press a little gemstone into the eyelash glue and hold it
with your finger until it sticks.


Step 5-
You are now ready to go out and party all night! Make
sure to include “Judas” in your playlist!


Karen, I loved this post because it was creative and fun. While I don't think I'll have an occasion tho use such dramatic make-up, I loved the segment on contouring and highlighting. Can you do a post expanding on that? I understand the concepts but would love to see a step by step guide that includes nose, cheeks and chin. Thanks
ReplyDelete