Sunday, June 30, 2013

The Body Shop Vitamin C Skin Boost

If you were to ask any employee of The Body Shop what their number one skin care product is, they would say the Vitamin C Skin Boost. And I can understand why.
This little skin serum/gel is silky to the touch and leaves skin feeling soft and smooth. It also absorbs quickly, so that your face isn’t left sticky or oily. It also has a refreshing orange-y smell, not unlike the company’s Satsuma line.
Upon application, the gel might look glittery or shimmery. Don’t fret, as this will not show up on you. This property will, however, help brighten your skin and give it a touch of radiance.

The only thing that drives me nuts about this product is that I can only wear it on foundation-free days, as any type of foundation I’ve tried to use with it (powder, liquid, cream, etc) slides right off and gives my face a blotchy appearance.


Final Verdict: Like It

Friday, June 28, 2013

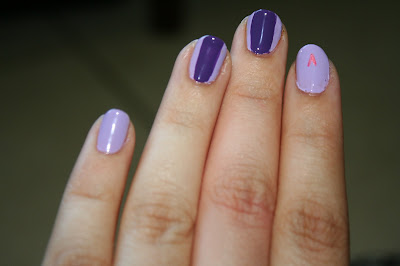
My Little Pony: Friendship is Magic Hooficures (Twilight Sparkle)

I have to be honest with you guys: I am a total Brony. Say what you will about the fandom, but the show is just darn cute. So when they coined the term “hooficure” in the second season, I just knew I had to come up with some fun tutorials for MLP:FIM fans everywhere! And which character to better start with, than the show’s protagonist, Twilight Sparkle?

Tools you’ll need:

Purple Nail Polish (OPI Nail Lacquer in Funkey Dunkey)
Lavender Nail Polish (Sally Hansen Extreme Wear in Lacey Lilac)
White Nail Polish (Sally Hansen Extreme Wear in White Out)
Indigo Nail Polish (Essence Color and Go Polish in Just Rock It)
Hot Pink nail polish or nail art pen (Sally Hansen Nail Art Pen in Hot Pink)
Nail art brush (available at beauty supply stores)

Step 1:
Paint your nails with the lavender shade. You’ll want this to be a very pigmented type, like the Sally Hansen one, as you won’t want too many layers mucking the design up. Make sure it is perfectly dry before continuing.

Step 2:
Use the purple color to paint some thick stripes down the middle of your middle and ring finger nails. Go slowly, to keep these as even as possible. If you need to add a second layer, go ahead, but do so very carefully.
Step 3:
On your index finger, start drawing Twilight’s Cutie Mark. The key to this design is drawing little triangles to make the star shape, and then filling them in. Begin with a diamond shape and remember to take your time.


Step 4:
Apply the same technique in drawing the diagonal points of the star.

Step 5:
When your purple stripes dry, use the indigo color to paint a thinner stripe inside of them.

Step 6:
With a very fine nail art brush use the white polish to create the little rays between the points of the star. I don’t recommend using a nail art pen or French manicure pen for this part, as you want very skinny lines and those could be messy here.


Step 7:
Using the dotting tool on the other end of the nail brush, dab little white shapes (two above the star, three on the bottom.) Keep them loosely formed, so they resemble stars from far away, but don’t use too much polish at once to avoid messes. Don’t worry if they aren’t perfect, though. They’ll be very tiny. I achieved these by using three little dots to mimic a star shape.

Step 8:
Paint a pink stripe within the indigo ones. Wait until everything is dry, then add a layer of top coat.


Enjoy your magical nails! 

Sunday, June 23, 2013

Michael Kors Leg Shine

Who doesn’t love glowing, dewy skin? Unfortunately, while we have lots of moisturizers and serums we can quickly slap on for that glow (not to mention some highlighting powder and blush) our bodies don’t always have the same luck. And while body lotion is great for keeping skin soft, it doesn’t usually have enough oomph to give you radiant legs and arms for a night out. This is why I love the Michael Kors leg shine, a little bronzing/shimmer gel that glides on to give your body an extra dash of radiance. 

Now, I’m already pretty tan, so I can’t say anything about the bronzing properties of this product. However, I do love the shimmer it gives to my skin: Subtle (meaning I don’t look like a Twilight Vampire) but enough of a glow that my skin looks more alive and alluring.

This swatch on my wrist is under indoor lighting…

...And while the effect fades a lot more in the outdoor lighting photograph, it was still noticeably lovely in person. 
Sadly, I could only get my hands on the little travel size version at Sephora. Bloomingdale’s and Neiman Marcus will have the normal size, though, if you think you’ll be using this product frequently. Only a final note, it comes in a delicious freesia-based scent that’s so elegant and delicious that I would consider using this product as a solid fragrance just to enjoy it. 


Final Verdict: Love it!  

Ingredients: BUTYLENE GLYCOL ,WATER\AQUQ\EAU, SODIUM STEARTH-100, FRAGRANCE, STEARTH-2, PVP, HYDROXYETHYLCELLUIOSE, POLYQUOTERNIUM-11, ISOSTEARYL ALCOHOL, LINALOOL, HYDROXY-CITRONELLAL, EUGENOL, BENZYL ALCOHOL, BENZYL BENZOATE, COUMARIN, LIMONENE, ISOEUGENOL, FARNESOL, BHT, MICA, IRON OXIDES[CI 77491, CI 77492, CI 77499], TITANIUM DIOXIDE[CI 77891], BLUE 1, RED 33, YELLOWB5.

Saturday, June 22, 2013

Tips and Tricks: Beauty Foods for Gorgeous Skin

There’s a lot of truth to the old saying “You are what you eat.” And if this is so, then it’s in our best interest to fill up on wholesome choices that will keep our bodies healthy. An added bonus? Lots of healthy foods won’t just keep you in good health, but will help your beauty out in the long run. Let’s look at some of our top Beauty Foods:

Nuts:

Not only do nuts help you feel fuller (leading to a little potential weight loss) and give you a dose of protein, but they can help make your skin beautiful. Most will pack a dose of Vitamin E or B, which are essential for healthy skin. Walnuts are beneficial, in particular, for their Omega-3 fatty acids, which will keep your skin hydrated and help reduce signs of aging. Try adding them to salads or oatmeal, but take care to not overdo it. These delicious treats are not low in calories, so no more than an ounce or two will be more than enough.

Green Tea:

In an earlier entry, I highlighted the benefits of green tea when topically applied to the skin. However, drinking it can do a lot to help, too! Green tea’s anti-oxidant and anti-inflammatory properties can help fix skin damage, particularly damage caused by the sun. It’s also good for flushing out your system, keeping you free of toxins.  

Soy:

If you’re going to use soy, I suggest sticking to its more natural forms, like edamame and tofu. That being said, it’s not like both of those can’t be made delicious! Soy will help you produce collagen, improving skin elasticity, reducing the signs of aging. It’s also a great aid for those that are going through a period of significant weight loss, as the more elastic skin is, the less it’ll hang loosely as you burn away inches.

Carrots and hummus:

Carrots are an excellent source of beta-carotene (a form of Vitamin A) that is excellent for fighting ultraviolet damage. Additionally, people who consume carrots regularly have noticed their ability to reduce acne and vanish acne scars (beta-carotene helps heal damaged tissue.) If you’re not a fan of munching plain raw carrots, then add a dollop of hummus for a delicious treat. The chick peas in hummus contain lots of zinc, an aid to collagen production that will keep your skin plump and radiant.

Greek Yogurt:

Another ingredient previously mentioned. Not only will the protein keep your skin nice and firm, it gives you a nice dose of vitamin A and other essential nutrients. I prefer Greek yogurt, because it has less fat and more protein than regular yogurt. Go for the plain variety (flavored ones often have a ton of added sugar) and mix in your own fruit and perhaps some nuts (like the ones mentioned in this entry!)

Berries:

The antioxidants found in berries will help protect your skin from free radicals. Strawberries in particular have a high content of vitamin C, one of the ultimate nutrients for protecting your skin from the sun. Cranberries are also a great choice, as their diuretic properties will help flush out your system more quickly, ridding you of toxins.  

Leafy Green Veggies and Tomato:

Dark green leafy vegetables, like spinach and kale will provide your skin with lutein. Lutein is essential in protecting the loss of collagen, keeping your skin fresh. Make a tasty meal of it, by throwing on some tomato. The acidity of tomatoes works as an astringent against excessive oiliness, helping fight acne from the inside out. They also contain all of the four known carotenoids (lutein, beta-carotene, carotene, and lycopene) which will not just benefit your skin, but will improve your all around health.

Papaya:

Another punch of vitamin C! More importantly, however, is the enzyme papain. Found only in papayas, this enzyme is an excellent way to boost up your body’s natural healing processes, helping to renew and refresh your skin. Want to speed things up? Mix up some papaya chunks with fresh (not canned!) pineapple. Pineapples contain bromelain, an enzyme that speeds up the effects of papain. Not that you needed another excuse to enjoy such a delicious fruity snack!

Salmon:

Not only does salmon contain some of the omega-3 we saw earlier, it also will give you a nice dose od selenium. Selenium will help reduce the inner oxidation of your body, leading to less acne-related complications. Try to consume it raw, but if that’s not to your liking, make sure to not overcook it.

Avocado:

Another familiar name on this blog! The healthy fats in avocado will keep your skin naturally moisturized. Erm…do, however, wait until the avocados are ripe (unlike the ones pictured) before you consume them. The ones in my yard won’t be ready for another month or so.  

Pomegranates:

Ah, pomegranates. Not only have they become one of the most talked about fruits in terms of antioxidants, they contain a very special one called ellagic acid. Ellagic acid helps rejuvenate skin, by accelerating the renewal of skin cells. This is especially beneficial to people who suffer from hyperpigmentation caused by skin damage.

Enjoy!

Sunday, June 9, 2013

Leopard print lips (In hot pink!)

Tired of old, boring lip looks? Want something that will floor everyone around you? Have somewhere to go where you can get away with wearing something this outrageous?! Try leopard print lips!
I’m gonna be teaching you this one with a hot pink background, but any color (though I recommend something light, like coral or orange) would work just fine.

What you’ll need:
A long-lasting pigmented lip color that dries to a matte finish (Kat Von D Everlasting Love Liquid Lipstick in Backstage Bambi)

Black gel liner (Maybelline Lasting Drama Gel Liner in Blackest Black)

A regular lipstick (or liner) that matches your original color (MAC Lipstick in Show Orchid)

You’ll want perfectly nude lips to start and consider doing a simple eye make-up to go along with these show-stopping lips.

Step 1:
Use your liquid lip color. You’ll want something that dries quickly, like a coat of nail polish for your lips. I know YSL and Hourglass carry a similar product, but my favorites are from Kat Von D. Let your product dry after application. I cannot stress enough the use of this sort of product over a regular lipstick, which will smear when you try to apply your spots.

Step 2:
Dip the edge of a small, angled brush into your black gel liner. A concealer brush works here, too. You won’t want too much product touching your lips as you apply it.

Step 3:
Begin dabbing on your leopard spots. Don’t follow a particular pattern, think of what actual leopard skin looks like. You’ll have spots, circles, and C shapes, in varying sizes. Variety is crucial. Don’t worry if not all of your spots are as solid as the others, leopards don’t have perfect markings either, but do try to keep them from getting sloppy. And for goodness’s sake, do NOT mash your lips together when you’re done!


Step 4:
Looks cool, but a little displaced, right? Use your black liner to paint a line around your lips. This will clean up the look and give it an edgier feel.

Step 5:
The black line might look too harsh (it does with this shade!) so take your matching lipstick and blend it lightly into the liner, softening the black.


Your make-up is finished! It is a fun and daring look. Go get ‘em, kitty!