
I love holidays that give me an excuse to wear something
colorful and loud that turns heads wherever I go. And what better holiday for
this, than Mardi Gras? Unfortunately for me, Mardi Gras only comes once a year
and The Gilded Lily missed it back in February. But with this makeup, I know I’ll
be prepared for February 12, 2013. Read on for a fun, sexy eye shadow look
incorporating the colors of one of my favorite crazy holidays.

Step 1:
Apply a foundation all over to give yourself a nice, even
skin tone. Skin imperfections draw attention away from pretty makeup, so you
want to cover any up. Also, since most of the attention will be drawn to your
eyes you’ll want dark circles or puffiness to be concealed.


Step 2:
Even though I love my brown eyes, I’m going to be using
green contacts for this look. They’ll help bring out the colors in my eye
shadow, plus green is one of the colors associated with Mardi Gras.

Step 3:
Apply eye shadow primer to just your lids. This will make colors pop and will help keep the
loose mineral make up in place. I suggest doing one eye and proceeding to the
next step, then coming back to do the next one, as this primer tends to dry
fairly quickly and you don’t want it to be spoiled. Also, make sure the
application is even and smooth, to avoid creasing.
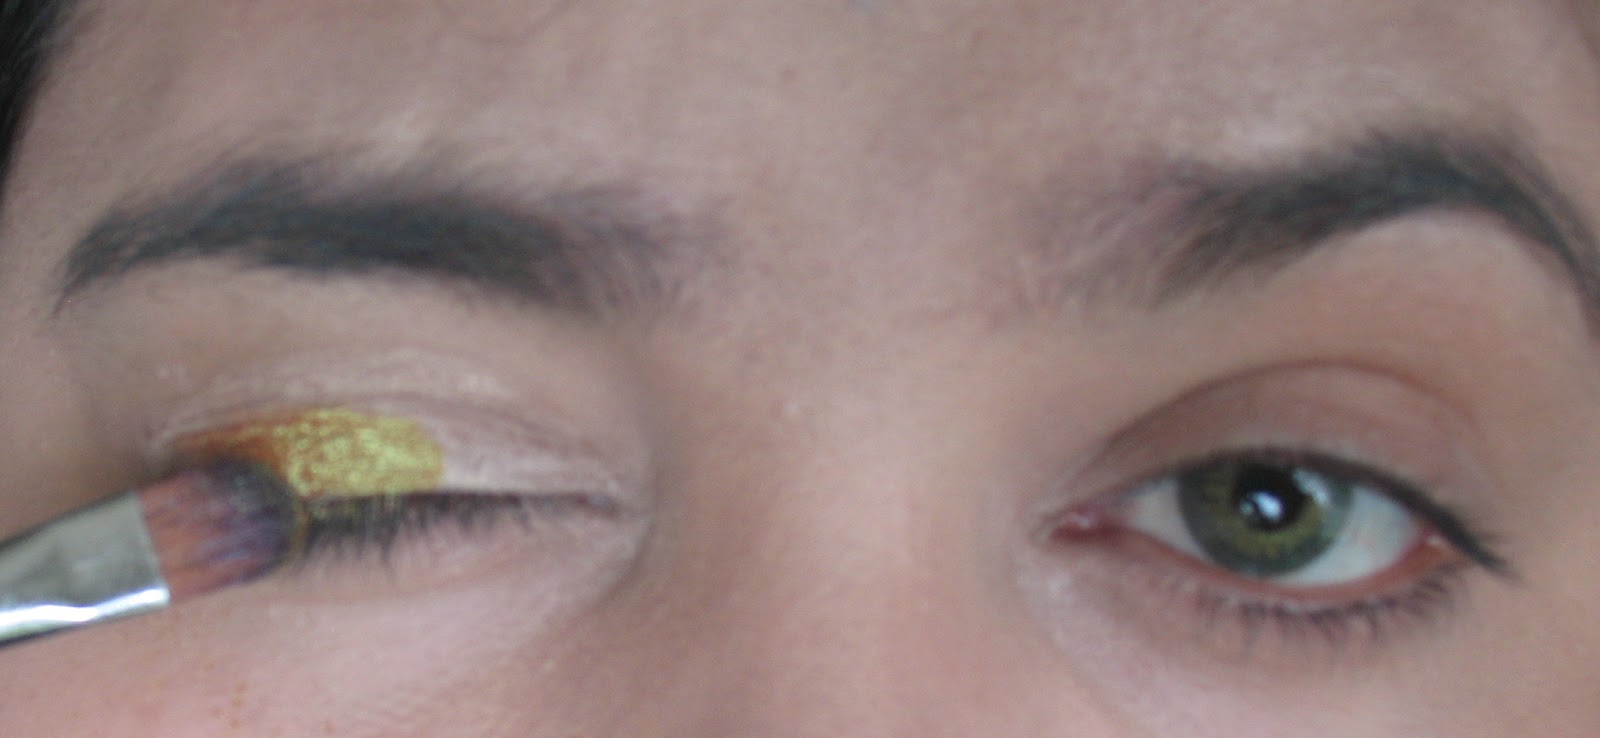


Step 4:
Apply a
gold shadow with reflective green hues to the area you primed. Here I’m using
Instant Beauty mineral shadow in Pear*. It’s a lovely, multicolored shade that
goes beautifully with the contacts. Take care apply to avoid spills.
*Note: I've only seen Instant Beauty kiosks in Miami malls,
so I’m not sure if the brand exists elsewhere and I can’t find any information online
stating otherwise. Luckily, MAC, Inglot, and Coastal Scents offer eye shadows
similar to this shade.


Step 5:
Once both lids are done, use the eye shadow brush to
carefully line your bottom lids. Use primer if necessary to make a straight,
neat line.

Step 6:
Once again use your primer to prepare the area. This time,
cover the area from your crease to your brow bone, giving the outer corners an
upward sweep, as if you were doing a cat-eye look, but keep the corner rounded,
not pointy. Doing this will make it nearly impossible to mess up the eye shadow.
 Step 7:
Fill in the area you primed with a light yet vibrant
purple shade with pink undertones. If you have L’Oréal shadow due in Reckless like me,
use the lighter shade in the palette.


Step 8:
Once you’ve done both eyes, take a dark, deep purple (the darker shade for those using the L’Oréal duo) and form a line around the area you just filled in (don’t line the crease, though!)
With tiny, gentle downward
strokes, blend in the darker shade so that it gives the shadow a gradient
effect.


Take the same shade and lightly blend it into the outer section of the brow bone, making sure to keep the edge of the line darker. You want to give it a fading effect, not cover the lighter color up.


With a green eye pencil, line your top and bottom lashes. Don’t
worry about making the line too thin, as you want it to be noticeable. Also, if
you use the same pencil from The Body Shop, keep in mind that it’s very creamy
and dulls out very quickly (as you can see in the photo.)
Make sure to have an
eyeliner sharpener nearby, as dull pencils make for sloppy liner.


Step 12:
Line the bottom lashes with glitter, but only stick to the outer
corner. You want just enough so that it blends with the glitter on top. Doing
the line the whole way, would close off the eyes too much and make them look
smaller.

Use a high-drama mascara on your top and bottom lashes, like the YSL’s Shocking mascara, in a deep,
black shade. Make sure it’s one that will curl and extend your lashes. Remember,
this look is all about getting noticed. 


Almost done! With a black eye pencil, liner the lower and upper waterlines of your eyes.
There you have it! A fun, wild look for a fun and while holiday!
List of tools and
products I’m using, in order of appearance:
Lioele Beyond the solution BB cream
Expressions contact lenses in Green
Urban Decay Eye shadow Primer Potion
The Body Shop eye shadow brush
Instant Beauty mineral eye shadow in Pear
L’Oréal HiP Studio Secrets Professional Bright Shadow Duos in Reckless
The Body Shop metallic eye definer in #11 Vibrant Emerald
Urban Decay Heavy Metal Glitter Liner in Stagedive
Yves Saint Laurent Volume Effet Faux Cils Shocking Mascara in #1
Deep Black
Yves Saint Laurent Dessin Du Regard Crayon Yeux Haute Tenue Eye
Pencil in #1 Velvet Black
Enjoy, everyone!

wich brand of contact lenses and color do you use? they look so natural!
ReplyDeleteI use CooperVision Expressions. They're pretty fantastic. The colors really pop and they're comfy to boot. I have them in green (pictured) and blue, which you can see in action here: http://gildedlilybeauty.blogspot.com/2013/11/xena-warrior-princess-make-up.html?showComment=1386306811847#c9206953372918699754
DeleteThey aren't as natural looking as the green, but I still love how much they stand out. Plan on getting several more from this brand. :)