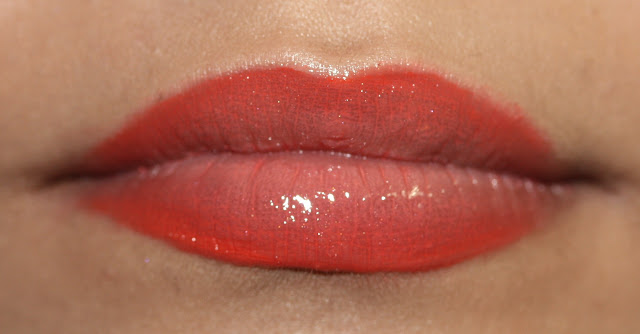
Are you tired of using the same old, boring swipe of
lipstick to complete your look? If you are, I have a neat little trick to liven
up your lip color.
A great way to add a little fun and life into your
lipstick is to use a gradient effect. It stands out, but isn’t so over the top
that you can’t use it during the day. It’s also extremely easy to achieve. Let’s
give it a try, shall we?
Version 1: Lovely Pink Gradient
Tools:
Ulta Lipstick in Sheer Rose
M.A.C. Lip Glass in Pink Fade
The Color Workshop Professional Series Lip Liner in Red
Lip balm
A lip brush
Step 1:
You want to start off by picking out the right lip
products. You’ll want a liner, a lipstick, and a gloss that are all from the
same color family. The liner should be the darkest, then the lipstick, and the
gloss should be the lightest or even clear. I chose the Color Workshop liner used here, because even though it is a red, it has a lot of magenta mixed into it,
which will look very nice with the pink.
Step 2:
Prep your lips by rubbing on some lip balm. Here I am
using Bliss’s fabulous balm. Use one that doesn’t dry up easily or is too solid
and it might help if you put on a little more than you normally would. To
really make the effects of the gradient work, you need your canvas to be
slippery, so apply away!
 |
 |
Step 3:
Apply your lipstick. Make sure it’s a nicely pigmented
shade that stands out on your lips.
Step 4:
Take the lip liner and line your lips, perhaps a little
thicker than you normally would. Don’t worry if you’re starting to look like
The Joker!
 |
| "Why so serious?" |
Step 5:
Take your lip brush and start blending the liner into the
lipstick in small, gentle strokes. You want to blend it away from the edges of
the lip, not towards it. Be careful not to blend it all away or all the way to
your mouth’s opening. The effect should start taking place!
Step 6:
If the liner is no longer visible or if you want to
deepen the color at the edges, go ahead and line your lips again, but take care
to keep this line very thin. You don’t want to spoil the work you already did!
Step 7:
Apply the lip gloss carefully in the middle. You don’t
want it to smear the liner. The main purpose of it is to highlight the lightest
part of the gradient.
Step 8:
You’re done! Take care not to press your lips together
while wearing this look. If you put on too much lip gloss, dab at it carefully
with a tissue. Voilà!
Version 2: Cool Violet Gradient
Tools:
Nyx Lipstick in Power
Ulta Lip Gloss in Charmed
Yves Saint Laurent Eye Pencil (Yes! Eye pencil!) in #10 Purple Silk
This style can also look great with cooler colors.
However, sometimes finding the right shade of lip liner can be a little bit of
a hassle. How to fix this? Using a colorful, matching eyeliner, of course! If
you can safely use an eyeliner on your waterline, then you’ll be able to apply
it on your mouth.
However, eyeliners might be a little bit trickier when it
comes to blending them in. Make sure to coax them a little harder with the lip
brush and don’t forget your balm!
Version 3: Dramatic Orange Gradient
Tools:
M.A.C. Lipstick in Morange
Profusion Diamond Shine Lip Gloss in A10- Orange
Sephora Nano Lip Liner in Really Red
Sometimes the lipstick you already have might be a little
too rich and bright for this look (Any fans of Morange can attest to this!) The
key is to not apply it in a stroke, but to dab it softly onto your lips with a
light hand. Don’t be afraid to lift some of it off with a tissue, until it is
light enough to work with.
While the effect might not end up being as striking, it
is still very beautiful!
Version 4: Romantic Peach Gradient
Tools:
Yves Saint Laurent Rouge Volupté
Profusion Diamond Shine Lip Gloss in A10- Orange
M.A.C. Lipstick in Morange
Lipstick? No problem! Gloss? Check! Liner? Uh-oh…
Not everyone is a fan of lip liners (or colorful eye
liner!) and while this look is hot, who’s gonna go out and buy a product they’ll
have no other uses for? ;) So what’s a gal to do?
 |
| That's what! |
Luckily, with your handy lip brush any shade of lipstick
can be instantly turned into a liner!
The application might be a little messier, but a quick
wipe around the edges of your mouth will clear that up. The final result?
Stunning!


No comments:
Post a Comment