Showing posts with label lips. Show all posts

Sunday, June 9, 2013

Leopard print lips (In hot pink!)

Tired of old, boring lip looks? Want something that will floor everyone around you? Have somewhere to go where you can get away with wearing something this outrageous?! Try leopard print lips!
I’m gonna be teaching you this one with a hot pink background, but any color (though I recommend something light, like coral or orange) would work just fine.

What you’ll need:
A long-lasting pigmented lip color that dries to a matte finish (Kat Von D Everlasting Love Liquid Lipstick in Backstage Bambi)

Black gel liner (Maybelline Lasting Drama Gel Liner in Blackest Black)

A regular lipstick (or liner) that matches your original color (MAC Lipstick in Show Orchid)

You’ll want perfectly nude lips to start and consider doing a simple eye make-up to go along with these show-stopping lips.

Step 1:
Use your liquid lip color. You’ll want something that dries quickly, like a coat of nail polish for your lips. I know YSL and Hourglass carry a similar product, but my favorites are from Kat Von D. Let your product dry after application. I cannot stress enough the use of this sort of product over a regular lipstick, which will smear when you try to apply your spots.

Step 2:
Dip the edge of a small, angled brush into your black gel liner. A concealer brush works here, too. You won’t want too much product touching your lips as you apply it.

Step 3:
Begin dabbing on your leopard spots. Don’t follow a particular pattern, think of what actual leopard skin looks like. You’ll have spots, circles, and C shapes, in varying sizes. Variety is crucial. Don’t worry if not all of your spots are as solid as the others, leopards don’t have perfect markings either, but do try to keep them from getting sloppy. And for goodness’s sake, do NOT mash your lips together when you’re done!


Step 4:
Looks cool, but a little displaced, right? Use your black liner to paint a line around your lips. This will clean up the look and give it an edgier feel.

Step 5:
The black line might look too harsh (it does with this shade!) so take your matching lipstick and blend it lightly into the liner, softening the black.


Your make-up is finished! It is a fun and daring look. Go get ‘em, kitty!


Sunday, May 19, 2013

Sparkly Lips Tutorial


The following is a cute little tutorial for adorably twinkly lips! We’re gonna go with a pink color scheme, because the materials will be easier to find in this shade, and heck, pink and sparkles just belong together!

You’ll need:
Shiny or metallic hot pink lipstick (NYX lipstick in Flower)
Shimmer powder (NYX Shimmer roll-on in Pink)
Pink glitter (NYX Glitter on-the-go in Hot Pink and LA Splash Body Glitter in Santa Monica)
Sparkly pink lip gloss (Lancome Juicy Tubes in Raspberry Ice)

Step 1:
Apply your pink lipstick. 

Step 2:
Apply the shimmer powder over your lips. If you’re using the one from NYX, just roll the product onto your finger and dab.

Step 3:
Add a coat of the sparkly pink lip gloss. This will help the glitter stick.

Step 4:
Dab the pink glitter on your lips. You’re done!

Optional step:
If this look is too over-the-top or you used too much glitter and it feels too grainy, just apply another coat of lip gloss over it. It’ll smooth it out a bit and reduce some of the shine.


Enjoy! 

Sunday, July 29, 2012

Cute Gradient Lips Trick (with variations)


Are you tired of using the same old, boring swipe of lipstick to complete your look? If you are, I have a neat little trick to liven up your lip color.

A great way to add a little fun and life into your lipstick is to use a gradient effect. It stands out, but isn’t so over the top that you can’t use it during the day. It’s also extremely easy to achieve. Let’s give it a try, shall we?

Version 1: Lovely Pink Gradient

Tools:
Ulta Lipstick in Sheer Rose
M.A.C. Lip Glass in Pink Fade
The Color Workshop Professional Series Lip Liner in Red
Lip balm
A lip brush 

Step 1:
You want to start off by picking out the right lip products. You’ll want a liner, a lipstick, and a gloss that are all from the same color family. The liner should be the darkest, then the lipstick, and the gloss should be the lightest or even clear. I chose the Color Workshop liner used here, because even though it is a red, it has a lot of magenta mixed into it, which will look very nice with the pink.

Step 2:
Prep your lips by rubbing on some lip balm. Here I am using Bliss’s fabulous balm. Use one that doesn’t dry up easily or is too solid and it might help if you put on a little more than you normally would. To really make the effects of the gradient work, you need your canvas to be slippery, so apply away!


Step 3:
Apply your lipstick. Make sure it’s a nicely pigmented shade that stands out on your lips.

Step 4:
Take the lip liner and line your lips, perhaps a little thicker than you normally would. Don’t worry if you’re starting to look like The Joker!

"Why so serious?"


Step 5:
Take your lip brush and start blending the liner into the lipstick in small, gentle strokes. You want to blend it away from the edges of the lip, not towards it. Be careful not to blend it all away or all the way to your mouth’s opening. The effect should start taking place!


Step 6:
If the liner is no longer visible or if you want to deepen the color at the edges, go ahead and line your lips again, but take care to keep this line very thin. You don’t want to spoil the work you already did!


Step 7:
Apply the lip gloss carefully in the middle. You don’t want it to smear the liner. The main purpose of it is to highlight the lightest part of the gradient.


Step 8:
You’re done! Take care not to press your lips together while wearing this look. If you put on too much lip gloss, dab at it carefully with a tissue. VoilĂ ! 


Version 2: Cool Violet Gradient

Tools:
Nyx Lipstick in Power
Ulta Lip Gloss in Charmed
Yves Saint Laurent Eye Pencil (Yes! Eye pencil!) in #10 Purple Silk

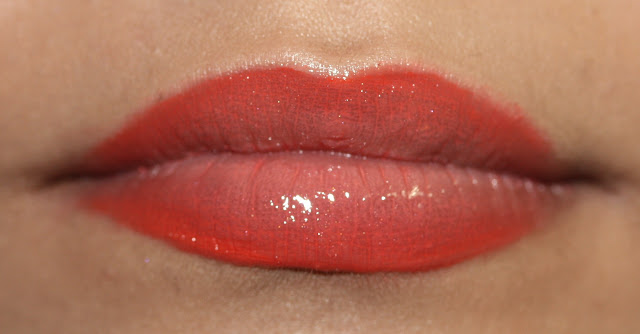
This style can also look great with cooler colors. However, sometimes finding the right shade of lip liner can be a little bit of a hassle. How to fix this? Using a colorful, matching eyeliner, of course! If you can safely use an eyeliner on your waterline, then you’ll be able to apply it on your mouth. 


However, eyeliners might be a little bit trickier when it comes to blending them in. Make sure to coax them a little harder with the lip brush and don’t forget your balm!


Version 3: Dramatic Orange Gradient

Tools:
M.A.C. Lipstick in Morange
Profusion Diamond Shine Lip Gloss in A10- Orange
Sephora Nano Lip Liner in Really Red

Sometimes the lipstick you already have might be a little too rich and bright for this look (Any fans of Morange can attest to this!) The key is to not apply it in a stroke, but to dab it softly onto your lips with a light hand. Don’t be afraid to lift some of it off with a tissue, until it is light enough to work with. 


While the effect might not end up being as striking, it is still very beautiful!

Version 4: Romantic Peach Gradient

Tools:
Yves Saint Laurent Rouge Volupté
Profusion Diamond Shine Lip Gloss in A10- Orange
M.A.C. Lipstick in Morange
Lipstick? No problem! Gloss? Check! Liner? Uh-oh…

Not everyone is a fan of lip liners (or colorful eye liner!) and while this look is hot, who’s gonna go out and buy a product they’ll have no other uses for? ;) So what’s a gal to do?
That's what!
Luckily, with your handy lip brush any shade of lipstick can be instantly turned into a liner!


The application might be a little messier, but a quick wipe around the edges of your mouth will clear that up. The final result? Stunning!